New Zealand Garages: the Ultimate Junk Drawer

It probably comes as no surprise that many vehicle owners end up receiving damage to their car from the clutter in their garage. Is your garage a dumping area for old paint tins, tangles of electrical wire, sports equipment and ‘mystery boxes’? Sometimes it can be daunting to face the job of sorting it all, but by turning the mountainous task into bite-size pieces, you can bring your out-of-control garage into focus.
Before you know it, you will have transformed the chaos into a functional, organised storage area. Perhaps you’ll even be able to open the car doors on each side!
Let’s break it down into chunks.

PREP:
Choose a weekend and a great playlist, enlist the family and get ready to get dirty! If the barbecue hasn’t already been dragged out and cleaned, this is the time to do it, so everyone can look forward to some sizzling sustenance throughout the day.
Purchase storage bins, floor cleaner, cat litter or sawdust (see ‘Removing Oil and Grease spots’ below) and mats if necessary. Grab dusters, buckets, scrubbing brush and a stiff bristled broom. Some big, strong rubbish bags or bins for sorting items will be handy too.
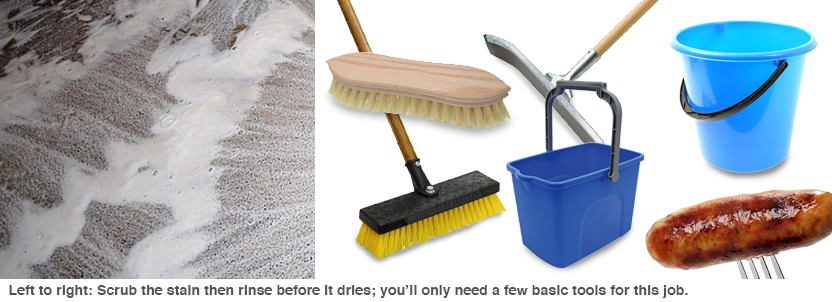
1. PURGE THE JUNK
The thing that makes garages look dirty more than anything else, is clutter. Jump in the deep end - drag everything out and have a clutter-ridding session, where every last oily bucket and vintage tool will be assessed and eliminated if need be. It’s time to visit those mystery boxes and see if they’re only holding old picture frames, glass jars (why so many??) or the diff’ off the old Vauxhall from way back.
A helpful gauge in the decision process is, if something hasn’t been used in a year, odds are it’s not necessary to keep it. There will, of course, be exceptions to this, so use discretion. Purge once, then go back through the ‘keep’ pile and purge again.
Create piles of the stuff to purge, according to their designated disposal solutions, such as:
- Take it to the tip (remembering that tip shops will sell off the usable items)
- Look up your local recycling centre for old electronics and metals
- Group old paints and chemicals for safe disposal (some paint shops will take back empty cans if the residue is dry)
- Donate used gear in good condition to the local Op Shop
- Sell online or have a garage sale
Now create piles of the ‘good stuff’ you want to keep. Make a list of your usage and storage priorities, making sure each item is something you and your family need. Group those items together as well:

STORAGE
- Seasonal sports gear summer / winter. These can share a storage area with the current season’s gear being easily accessible and out-of-season gear behind. Rotate each spring and autumn. Now is a good time to check gear, give it all a dust down and pack it neatly.
- Camping / Holiday equipment, sleeping bags, sun umbrellas
- Suitcases, totes etc
- Holiday Decorations
- Chemical cleaners and paints
REGULAR USAGE
- Cleaning products
- Bikes, skateboards, surfboards etc
- Ladders, hoses, vacuums, buckets and mops
- Garden equipment
- Tools - household along with nails, screws, glues and repair kits
- Tools - vehicle related
2. CLEAN
It’s not a fun job, but the results can last a long time if you do it right. Fuel up with a sausage, take a deep breath, put on a hat (to save spiders from dropping into your hair!) and have a massive dust-a-thon. It might be a good idea to put on a mask too (garages can house mouse droppings, chemicals, and all sorts of things you don’t want to breathe in). Make sure you dust and remove cobwebs from rafters, workbenches, window sills and all the other nooks and crannies in the garage. Clean out the storage cupboards and racks. Replace old and faulty racks, hinges and knobs.

The floor is the main area that will require attention. Use a large broom to sweep up debris. A leaf blower and/or vacuum cleaner might also come in handy.
Give the floor a good scrub. Tip: Push brooms make a poor scrub brush. The bristles are too long and the surface area is too large to apply good pressure. Try a deck brush with the short stiff bristles, these work best. Use a designated concrete cleaner, or even dishwashing liquid can do a good job on a greasy floor.
Don’t let your scrubbed areas dry before you hose them off. The reason for this is that the contaminants in the pores of the concrete are emulsified and lifted out in the solution while it is still wet. This makes it easy to rinse out with a high pressure hose or sprayer. If it starts to dry out, these contaminants can be left behind with the rinsing.
Another tip: after hosing down, one tool that will come in handy is a floor squeegee. These work great at moving large volumes of water out of the garage and for clearing water out of low spots. If you don’t have a squeegee, an old broom will help.
If you’re serious about having the sort of garage that looks good with the door open, it might be time to deep-clean the floor.
REMOVING OIL AND GREASE SPOTS FROM THE GARAGE FLOOR
- Cover grease stains with a layer of sawdust or cat litter. These materials absorb excess oil remarkably well. Leave the sawdust or cat litter on the floor for at least a day.
- Use a push broom with rigid bristles to sweep up the sawdust, cat litter and dirt.
- Pour dry dishwasher detergent or a concrete cleaning agent on the stain. Let the detergent sit for 45 minutes, then pour boiling water on the area and vigorously scrub the stained section. Rinse off with high pressure if possible, following above guidelines regarding not letting it dry first.
- For more stubborn stains, use a specialised concrete cleaner in combination with your pressure sprayer.
Once the floor is clean and dry, think about placing mats in high traffic spots so that they can be taken outside to shake periodically. This can be helpful if the garage is a difficult space to sweep or vacuum due to space constraints.
3. RE-THINK THE SPACE AND STORE SMART
Time to put everything back! Hopefully there is a lot less than when you started…
Divide the garage into zones. Visually differentiated areas help ensure everyone knows what’s going where and makes it more likely that things will be returned to their allotted place. This also helps you set limits on volume - whatever doesn't fit into its appointed zone is toast! Use colour to delineate the areas, with paint or coloured tape.

Anything stored in cardboard boxes (a favourite nesting material for rodents) should be transferred to plastic. Small bins for often-used items, large bins for longer-term storage. Plastic bins can also stack on top of each other, eliminating an urgent need for racks. Categorise the plastic bins by colour and/or label them clearly.
Keep as much off the floor as you can. This will make the garage stay clean for much longer! Vertical storage is a fantastic solution for the garage. Hooks, racks and shelving along the walls makes it easy to see, maximises the space available for moving around and gives you a lot of extra storage volume.
There are endless options and some very innovative ideas for storage and organisation in garages. We’ll take at look at some of these in up-coming articles but for now, hopefully you have set a date and roused up some enthusiasm to get your garage glowing! Or at the least being able to accommodate a vehicle or two.

Related Articles